
成为一个职业的职业人
工作多年后,慢慢的人就成熟了,做事慢慢也有了章法,有了自己的方法论;对团队的理解也更深刻了。
近几年随着疫情,大家默默形成了远程办公的习惯,而很多人还是没有从思想上形成远程办公的习惯。
工作多年后,慢慢的人就成熟了,做事慢慢也有了章法,有了自己的方法论;对团队的理解也更深刻了。
近几年随着疫情,大家默默形成了远程办公的习惯,而很多人还是没有从思想上形成远程办公的习惯。
娃快3个月了,周末不上班,所以周五和周六晚上就和娃一起睡了。每天晚上娃都会随机的醒来三四次,导致睡眠质量下降。每周末,我都要去打球,然而这周刚上场没打10分钟就累的不行了,整个早上,就有效的打了30分钟左右,整个人都累趴了。

计算机世界几乎就是建立在开源项目之上的。近几年,国内外有很多开源项目出圈,例如 CNCF 的Kubernetes, 百度在Apache 毕业的 EChart。开源不仅可以展示自己的技术能力,而且还可以为他人提供免费“物料”,减少重复造轮子的事的发生,“间接为全球碳中和做贡献”。
数字证书就是互联网通讯中标志通讯各方身份信息的一串数字,数字证书由经国家工信部认证的权威机构——CA 机构发行,是身份认证机构盖在数字身份证上的一个章或印(或者说加在数字身份证上的一个签名),人们可以在网上用它来识别对方的身份。
现代社会每个人都有自己的社交圈子,也有自己的信息茧房。某天突然的一个信息可能会破坏原有的信任关系。比如突然的一个年终总结。
最好的总结,总是自驱的,规律性的,有目的性的。

本文是近期为学弟学妹们演讲时用 Logseq 整理的大纲,在此记录一下,以备复用。
https://guzhongren.github.io/about/[1]
Do you really like computer science??? 灵魂三问,你真的喜欢计算机科学吗?如果不喜欢早点放弃,不然你以后的每一刻都会感到无比的痛苦。

在工作中,邮件是我们经常要用到的工具;不管是内部还是外部,一个好的邮件签名不仅可以增强公司的品牌影响力,而且也会为你的客户留下"专业"影响,你可能会因此赢得商机,或者获得一份新工作等等。
最近上了一个Ops 的项目,此Ops 非彼Ops。 一般的Ops 都是直接在生产环境进行做一些维护升级等,而我们的Ops工作是一个类似客服的角色。需要在开发上线之后解决所有生产环境的问题,并且为客户方解决他们日常管理中的各种问题,还有为客户产品的使用者解决线上生产问题或着寻找他们提出的各种问题的原因。

Logging is structured or unstructured text information generated by the system during operation. Usually, it can be regarded as a record of an event by the application. Logging can often help us discover unexpected behaviors in systems, especially in some microservice architecture systems. As an important part of Observability, Logging plays an irreplaceable role in our system development and maintenance.
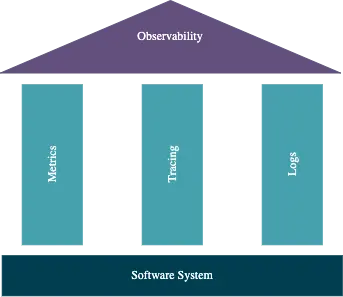
To understand why logging plays an important role in products or systems, we must understand its value. Currently, the most widely used logging forms are alerting, troubleshooting, and business data visualization.

有时候我们用 DrawIO 在线版[1] 或者 VSCode 插件画图的时候,需要使用自己公司的配色和字体要求来做图;如果一个一个图形的选择,然后输入对应的样式值,这样很浪费时间;作为高效能人士,肯定需要将其形成模板存起来,使用的时候自动读取即可。所谓“一劳永逸”。